TeltoCare First Start: Difference between revisions
| (One intermediate revision by the same user not shown) | |||
| Line 12: | Line 12: | ||
[[Image:Teltocare TeltoHeart.png|500px|center|link=]] | [[Image:Teltocare TeltoHeart.png|500px|center|link=]] | ||
<p style="margin-top:16px; font-size:15px; color:#333; max-width:720px; margin-left:auto; margin-right:auto; text-align:center;">TeltoCare is used to display | <p style="margin-top:16px; font-size:15px; color:#333; max-width:720px; margin-left:auto; margin-right:auto; text-align:center;">TeltoCare is used to display elecrocardiogram and heart rate data collected by TeltoHeart and transmitted by the TeltoHeart mobile application for further analysis and interpretation by qualified clinicians.</p> | ||
<p style="text-align:center; margin-top:12px;">TeltoCare is reachable via: [https://teltocare.com https://teltocare.com]</p> | <p style="text-align:center; margin-top:12px;">TeltoCare is reachable via: [https://teltocare.com https://teltocare.com]</p> | ||
| Line 21: | Line 21: | ||
IDENTIFYING A LEGITIMATE WEBSITE | IDENTIFYING A LEGITIMATE WEBSITE | ||
════════════════════════════════════════════════ --> | ════════════════════════════════════════════════ --> | ||
== How to identify a legitimate TeltoCare website == | == How to identify a legitimate TeltoCare website == | ||
| Line 745: | Line 746: | ||
| style="padding:16px; width:33%; vertical-align:middle;" | | | style="padding:16px; width:33%; vertical-align:middle;" | | ||
|- | |- | ||
<hr style="border:none; border-top:2px solid #E8F0FB; margin:16px 0;"/> | |||
<p style="font-size:16px; font-weight:700; color:#0054A6; margin:0 0 16px;">Certifications</p> | |||
{| style="width:100%; border-collapse:collapse; text-align:center;" | |||
|- | |||
| style="padding:16px; width:33%; vertical-align:middle;" | [[File:CE MDR labeling.png|center|160px]] | |||
|} | |} | ||
</div> | |||
= Additional information = | = Additional information = | ||
Latest revision as of 09:37, 16 June 2026
Main Page > TeltoCare > TeltoCare First Start
TeltoCare system
TeltoCare system
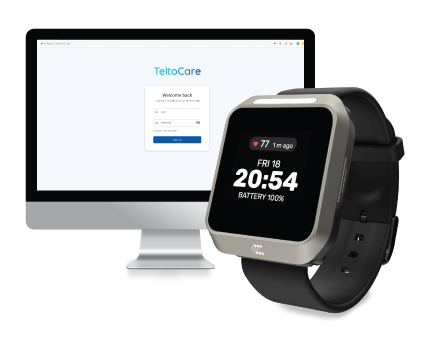
TeltoCare is used to display elecrocardiogram and heart rate data collected by TeltoHeart and transmitted by the TeltoHeart mobile application for further analysis and interpretation by qualified clinicians.
TeltoCare is reachable via: https://teltocare.com
How to identify a legitimate TeltoCare website
How to identify that you are entering a legitimate TeltoCare website
| Check the URL: Look at the website URL to ensure it is spelled correctly and matches the website you intended to visit. Phishing scam websites often use similar-looking URLs to trick users into thinking they are on a legitimate website. | |
| Check for SSL encryption: Look for the padlock icon or "https" in the website address to confirm the website uses SSL encryption. Phishing scam websites often do not have SSL encryption or may have invalid SSL certificates. | |
| Look for branding inconsistencies: Check for any inconsistencies in the branding, logos, or design of the website, as phishing scam websites often use inaccurate or outdated branding to appear legitimate. |
![]()
Compatibility
Compatibility
A computer or any device with a web browser is compatible with:
- Mozilla Firefox browser v114 or newer
- Google Chrome browser v100 or newer
- Safari browser v16.5 or newer
![]()
Note:
- Using a browser version earlier than specified might result in reduced functionality or compatibility issues.
- If you are using a browser not listed here, you might experience compatibility issues. We recommend switching to one of the supported browsers for a better experience.
- Always ensure that your browser is up-to-date for the best security and performance.
Data transfer to TeltoCare web platform
Data Transfer to TeltoCare Web Platform
When the TeltoHeart mobile application is running in the background, data collected by the TeltoHeart smart wearable is scheduled to transfer to the TeltoCare web platform automatically on an hourly basis. This automatic transfer ensures that your health data remains up-to-date and readily available for analysis and management on the TeltoCare platform.
Additionally, users have the option to manually initiate a data sync through the TeltoHeart mobile application. By tapping the SYNC NOW button within the app, users can trigger an immediate transfer of collected data to the TeltoCare web platform, allowing them to ensure their latest health information is promptly uploaded regardless of the scheduled hourly transfer.

TeltoCare hierarchy
TeltoCare hierarchy
TeltoCare's hierarchical structure outlines the different roles and responsibilities within the TeltoCare ecosystem, from high-level administrative functions to specialised roles tailored to specific organisational levels and user types.
TeltoCare permissions
| Permission | Distributor Admin |
Distributor Sales |
Distributor Support |
Hospital Admin |
Hospital Support |
Doctor | Patient |
|---|---|---|---|---|---|---|---|
| Create / delete / suspend / unsuspend / restore / edit permissions for users | Admin Users | Sales Users | Support Users | Admin Users | Support Users | N/A | N/A |
| Edit information (including mandatory and non-mandatory) | Distributor Admin | Distributor Sales | Distributor Support | Hospital Admin | Hospital Support | Doctor | N/A |
| Suspend, delete, unsuspend, and restore distributors | Yes | No | No | No | No | No | N/A |
| Suspend, delete, unsuspend, and restore hospitals | Yes | No | No | No | No | No | N/A |
| See internal users | Yes | Yes | Yes | Yes | Yes | Yes | No |
| See the list of distributors (all) | Yes | Yes | Yes | No | No | No | No |
| See the list of hospitals (all) | Yes | Yes | Yes | Yes | Yes | Yes | No |
| See the statistics dashboard | Distributors | Distributors | Distributors | Hospitals | Hospitals | Hospitals | N/A |
| Get usage history | Telemedic & Distributor | No | No | Hospital & Distributor | No | Hospital | No |
| Edit patient information | No | No | No | No | No | Yes | Own |
| Edit doctor information | No | No | No | No | No | Yes | No |
| View / download personal and medical information | No | No | No | No | No | No | Yes |
| Delete personal and medical data | No | No | No | No | No | No | Yes |
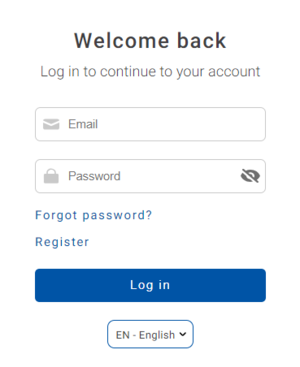
TeltoCare login
TeltoCare login
| Open a web browser and go to https://teltocare.com. | |
| Enter your email and password in the login fields. | |
| If it is your first time using the platform, sign in using the email address and temporary password sent to your email. |

| TeltoCare will prompt you to change the temporary password to your preferred one. |
| Once your preferred password is set, you will be able to log in to the TeltoCare distributor environment. |
Register as a patient
| Visit https://teltocare.com. | |
| Click Register. |
| Fill in the required information. | |
| Click Register to complete the registration. |
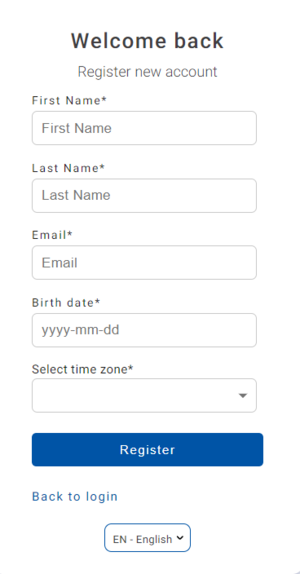
| After registration, fill in your login details in the TeltoHeart mobile application to Log in. |
Distributor's environment
Distributor's environment
Within the TeltoCare platform, distributors have the ability to create accounts for hospitals. As part of their environment, distributors facilitate the onboarding process for healthcare professionals who will provide medical services through the platform.

Navigation bar

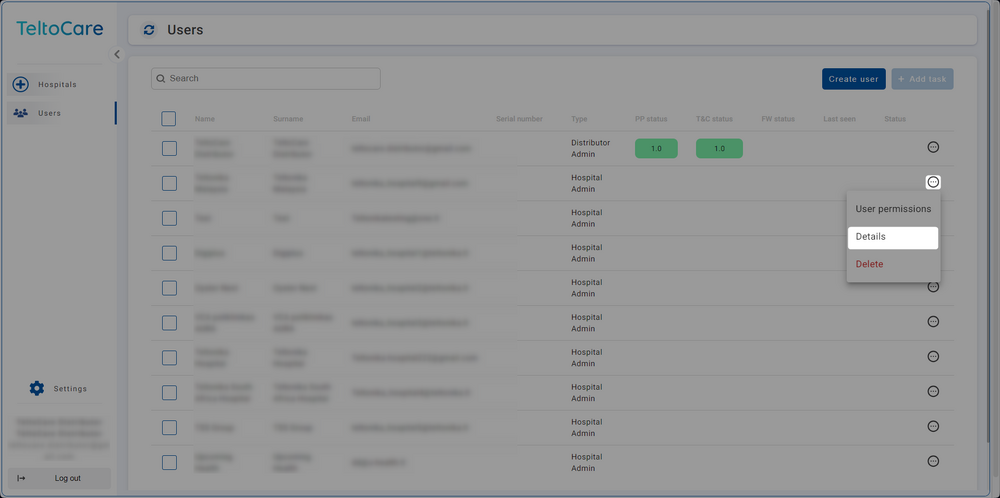
User list
| The User list provides the ability to view contact details, including names, surnames, phone numbers, emails, and affiliated hospital. |
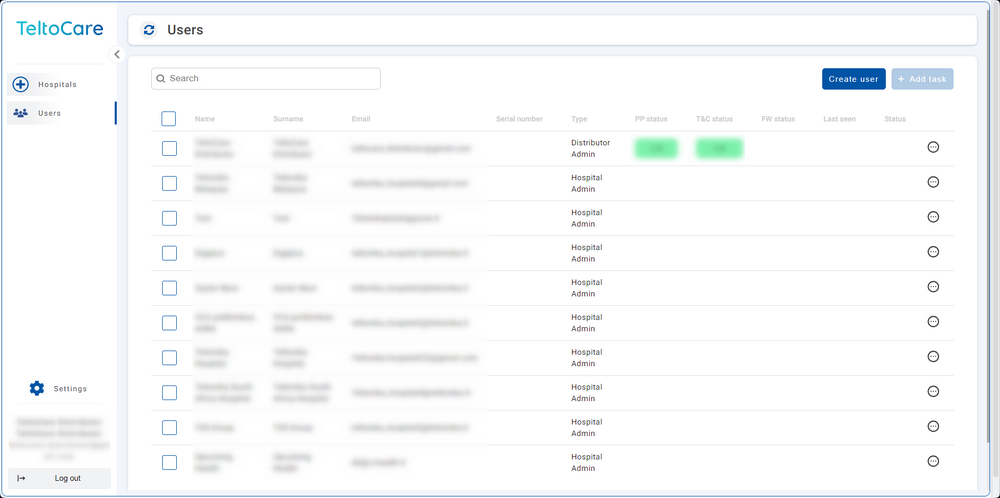
| Click ... and select Details to view a hospital's patient list. |
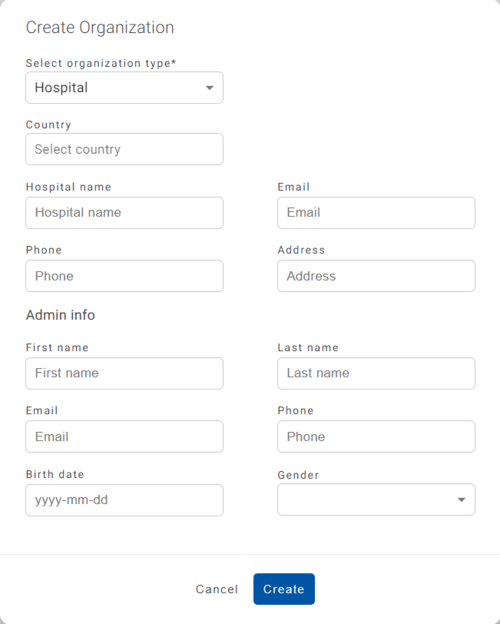
Create a Hospital environment
| Click the Create Organization button in the top right to create a Hospital account. |
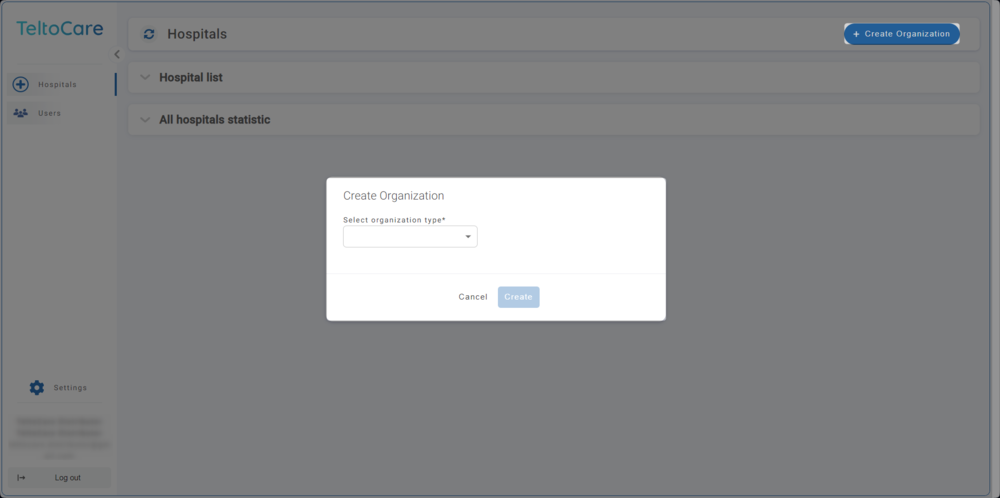
| Enter the required information and click Create to establish the Hospital account. Once created, an invitation email will be sent. |
Hospital environment
Hospital environment
The hospital environment provides the ability to view a full list of the hospital's doctors and patients, create new doctor accounts, and view assigned patients along with their medical data such as events, electrocardiogram readings, atrial fibrillation events, and heart rate.

Navigation bar

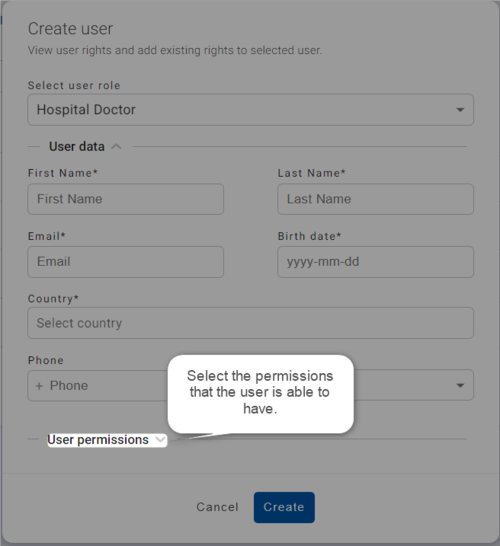
Create user
| Click the Create button to set up a new patient or doctor account. |
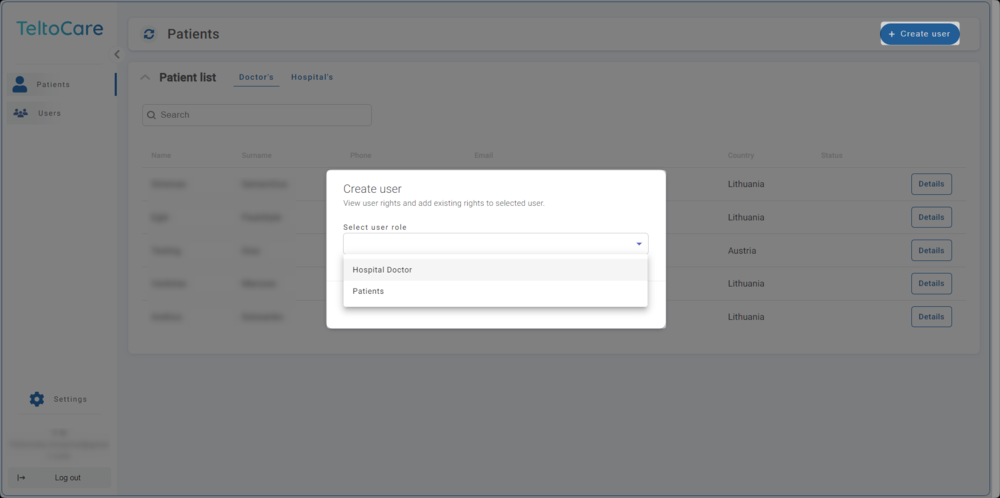
| Enter the required information and click Create to establish the account. Once created, an invitation email will be sent to the provided email address. |
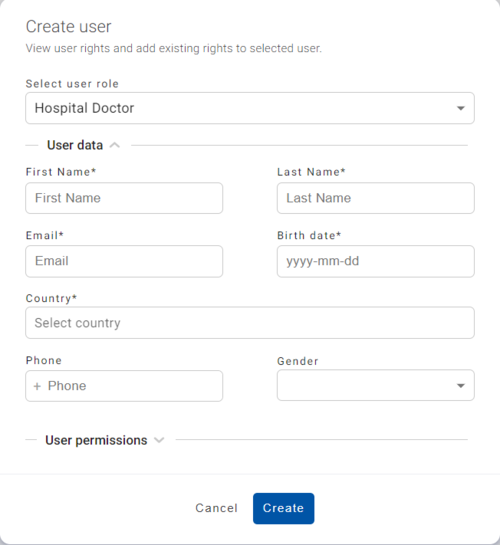
| Select the permissions the user should have. |
Doctor environment
Doctor environment
Doctors within the TeltoCare platform have access to specific patient information and data for medical purposes. They are authorised to view patients' medical records, personal information, and ECG measurement data, enabling accurate diagnoses and appropriate treatment recommendations.

Navigation bar
Create user
| Click the Create button to set up a new patient or doctor account. |
| Enter the required information and click Create to establish the account. Once created, an invitation email will be sent. |
| Select the permissions the user should have. |
Patient list
| The patient list provides the ability to view patient contact details, including names, surnames, phone numbers, emails, and country. |
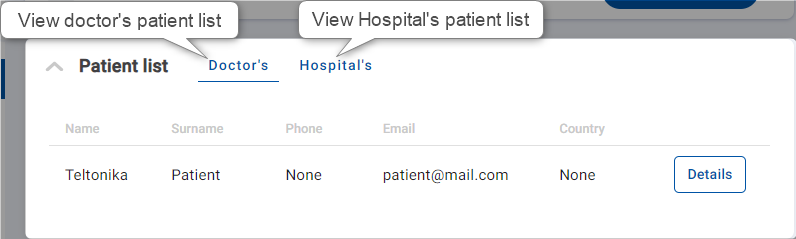
| Click on the first tab to view a patient's contact details. |
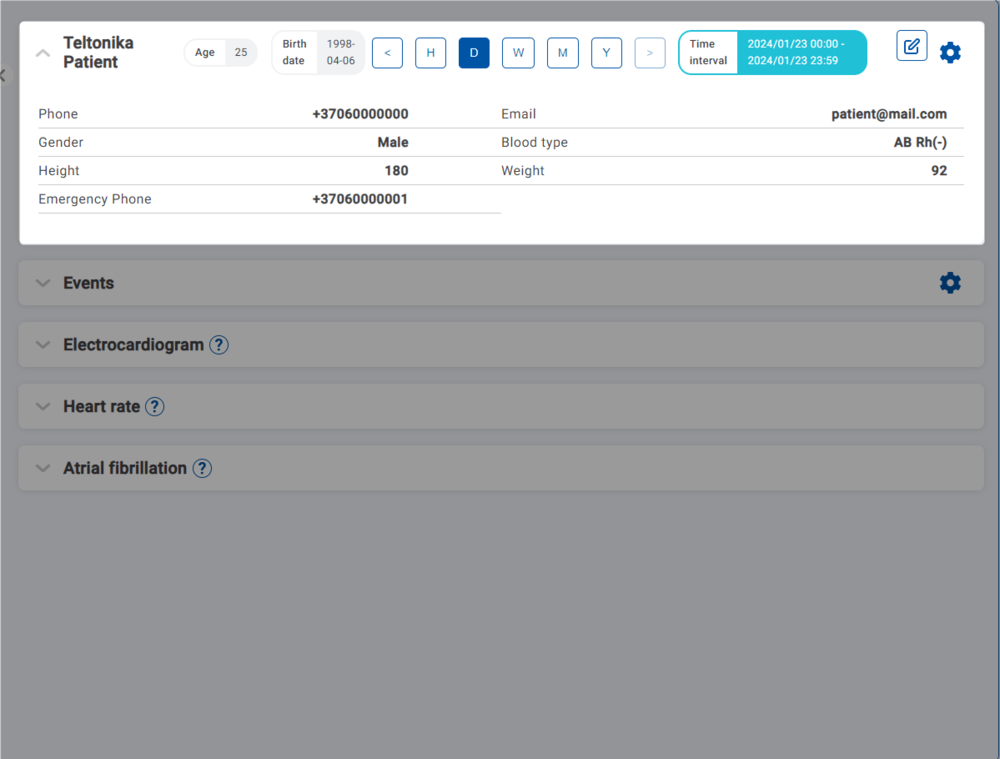
Time interval
| Choose a time frame to view data. You can select by hour, day, week, month, or year, or use the < and > icons to navigate. |
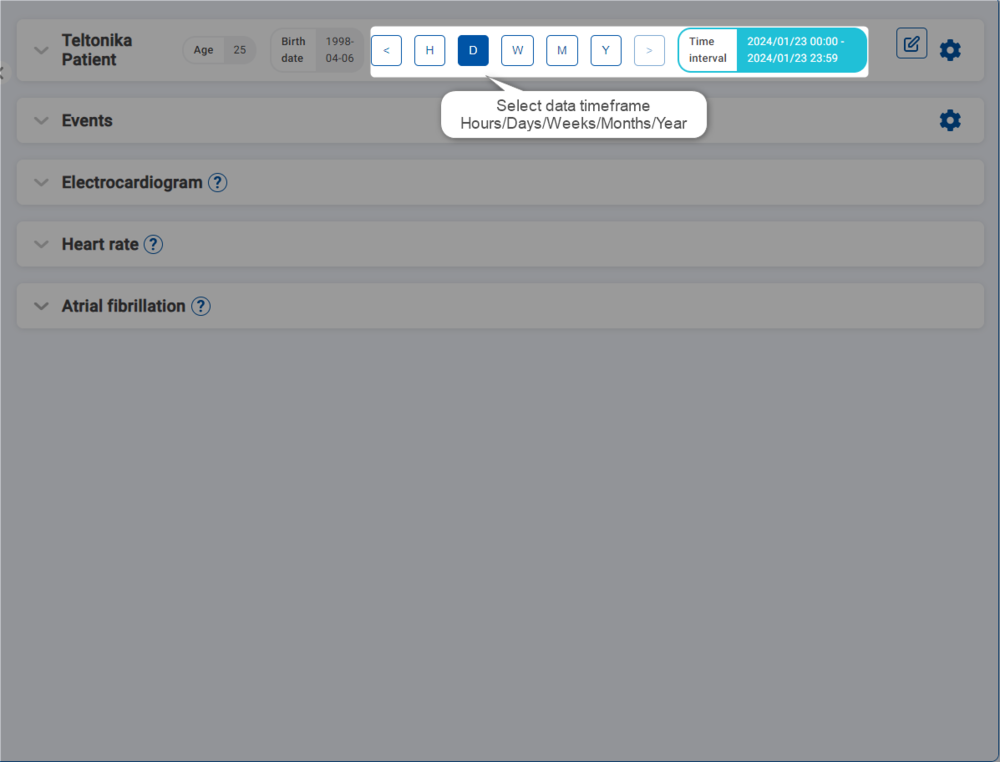
| You can also manually select a time interval and choose a specific date. |

Edit patient's information
Tap the pencil icon to edit a patient's information. Click Edit to confirm the changes.

Delete a patient
To delete a patient's account, click the gear icon and select Delete Patient.

![]()
Patient events
Click the Events tab to view the patient's heart rate events. To configure heart rate events and add thresholds, tap the gear icon and click Add Thresholds.

Patient's electrocardiogram
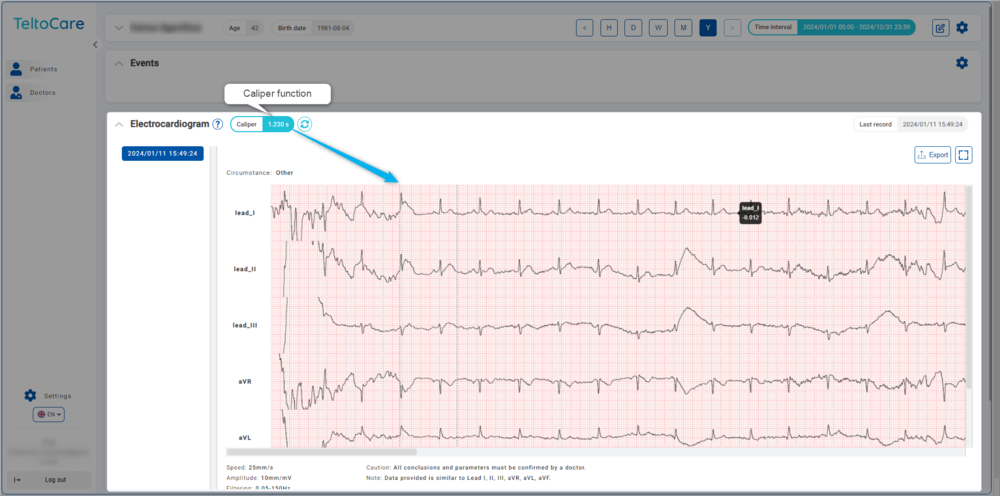
Review the ECG recordings displayed on the Electrocardiogram tab to access data related to the patient's electrocardiogram.

Caliper tool
The Caliper Tool is a feature designed to streamline the analysis of ECG waveforms. It allows users to measure the time interval between two chosen points on the ECG waveform, simplifying beat-to-beat interval measurement and enhancing the precision of ECG feature analysis.
| Open the Electrocardiogram tab and select the desired ECG waveform. | |
| Locate the ECG Caliper Tool and position the calipers on the two points you wish to measure — typically R-waves for RR intervals. | |
| The tool will automatically calculate and display the time interval. | |
| To start a new measurement, use the reset function. |
Heart rate
The Heart Rate tab displays both minimum and maximum heart rates, as well as the dates on which these measurements were taken. Heart rate is measured in beats per minute (BPM).

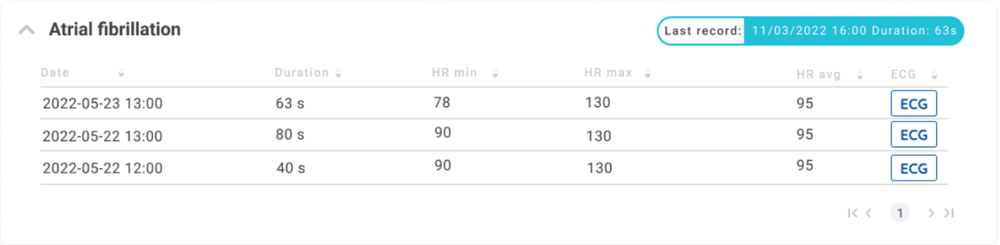
Atrial fibrillation
TeltoCare offers a dedicated Atrial Fibrillation Monitoring feature to assist in managing atrial fibrillation conditions effectively. When you access the Atrial Fibrillation tab, you will find the following information for each episode:
- Date: The date on which each episode occurred.
- Duration: How long each atrial fibrillation episode lasted.
- Min Heart Rate: The minimum heart rate recorded during each episode.
- Max Heart Rate: The maximum heart rate during each episode.
- Heart Rate Average: The average heart rate during each episode.
Enabling Atrial Fibrillation
| On your TeltoHeart, tap the side button to open the menu and select the AFib function. |
| Tap Active to activate the atrial fibrillation function. |

Accessing detailed records
| Each episode listed includes a dedicated button. Click it to access the corresponding ECG record, allowing you to visually examine the electrical activity of the patient's heart during the episode. |
TeltoCare markings
Certifications
 |
Manufacturer |
 |
Additional information
Product Page
Changelog
TeltoHeart Manual
PROMOTIONAL MATERIAL
CERTIFICATES
All newest certificates can be found on our Certifications and Approvals wiki page.