TeltoCare manual: Difference between revisions
| Line 249: | Line 249: | ||
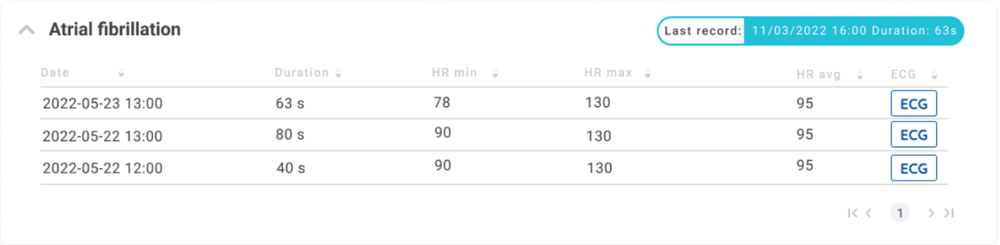
When you access the Atrial Fibrillation tab, you will find essential information about your atrial fibrillation episodes: | When you access the Atrial Fibrillation tab, you will find essential information about your atrial fibrillation episodes: | ||
* Date: The date on which each episode occurred is listed, helping you track the timing and frequency of your episodes. | * '''Date:''' The date on which each episode occurred is listed, helping you track the timing and frequency of your episodes. | ||
* Duration: This field displays how long each atrial fibrillation episode lasted, giving you insights into the severity of each event. | * '''Duration:''' This field displays how long each atrial fibrillation episode lasted, giving you insights into the severity of each event. | ||
* Min Heart Rate: You can view the minimum heart rate recorded during each episode, which is vital in understanding heart rate fluctuations. | * '''Min Heart Rate:''' You can view the minimum heart rate recorded during each episode, which is vital in understanding heart rate fluctuations. | ||
* Max Heart Rate: The maximum heart rate during each episode is presented, aiding in gauging the intensity of these episodes. | * '''Max Heart Rate:''' The maximum heart rate during each episode is presented, aiding in gauging the intensity of these episodes. | ||
* Heart Rate Average: This field provides the average heart rate during each episode, offering a comprehensive view of your heart's performance during | * '''Heart Rate Average:''' This field provides the average heart rate during each episode, offering a comprehensive view of your heart's performance during | ||
atrial fibrillation | atrial fibrillation | ||
|- | |- | ||
Latest revision as of 16:55, 20 February 2024
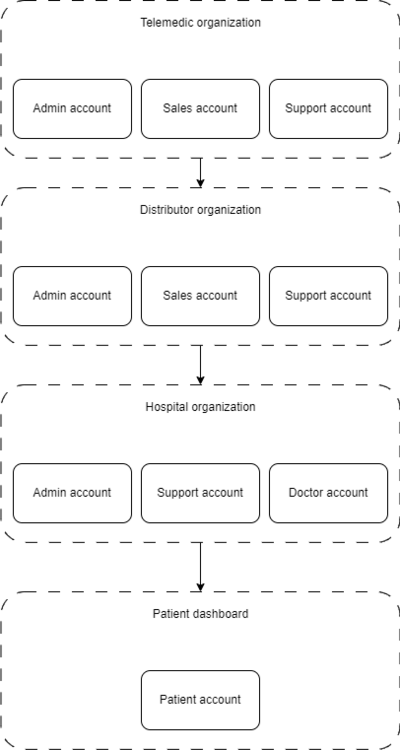
TeltoCare hierarchy
TeltoCare hierarchy | ||
| TeltoCare hierarchical structure outlines the different roles and responsibilities within the TeltoCare ecosystem, from high-level administrative functions to specialized roles tailored to specific organizational levels and user types. | ||
|
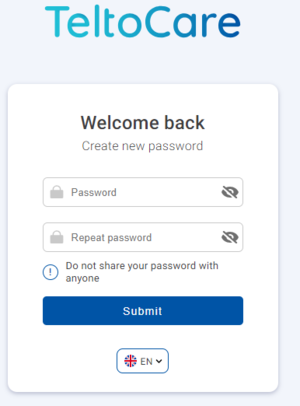
TeltoCare login
TeltoCare login | ||
 Open a web browser and go to the URL: https://teltocare.com Open a web browser and go to the URL: https://teltocare.com | ||
 Enter your password in the login field. Enter your password in the login field. | ||
 If it is your first time using the app, sign-in by entering e-mail address and the password, which has been sent to your e-mail. If it is your first time using the app, sign-in by entering e-mail address and the password, which has been sent to your e-mail.
| ||

| ||
 TeltoCare will prompt you to change temporary password to your preferred one. TeltoCare will prompt you to change temporary password to your preferred one.
| ||
| ||
 When preferred password is set up, you will be able to login to TeltoCare distributor’s environment. When preferred password is set up, you will be able to login to TeltoCare distributor’s environment.
|
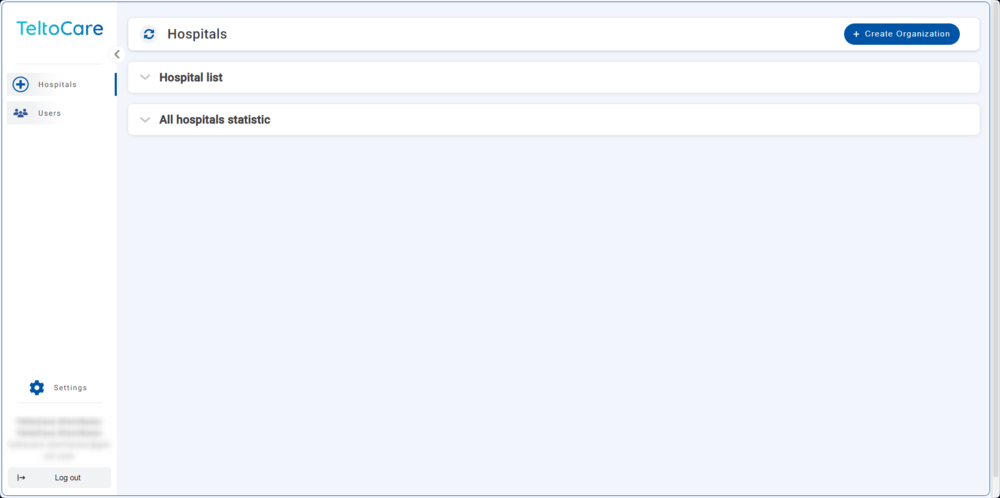
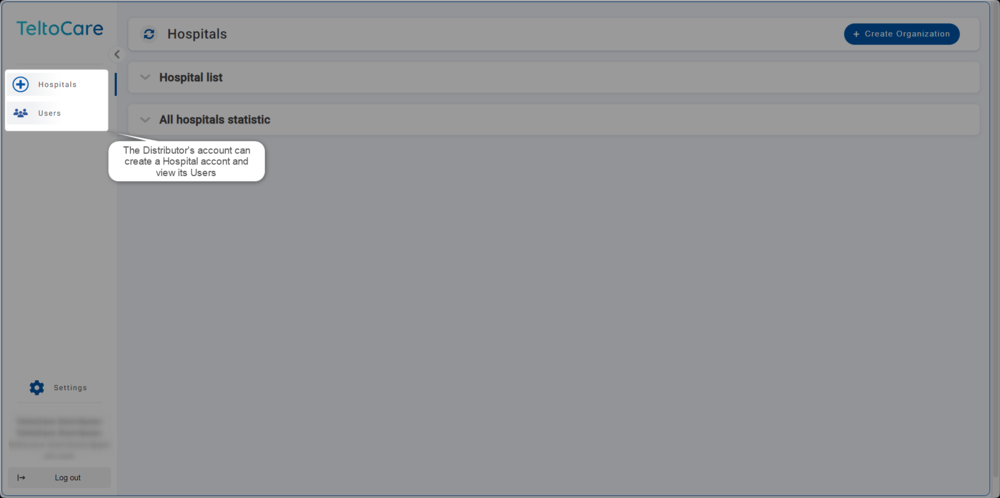
Distributor's environment
Distributor's environment | ||
| Within the TeltoCare platform, distributors have the ability to create accounts for hospitals. As part of their environment, distributors facilitate the onboarding process for healthcare professionals who will be providing medical services through the platform. This involves creating accounts for hospitals, granting them access to the necessary features and functionalities of the TeltoCare platform. | ||
|
Navigation bar | ||
|
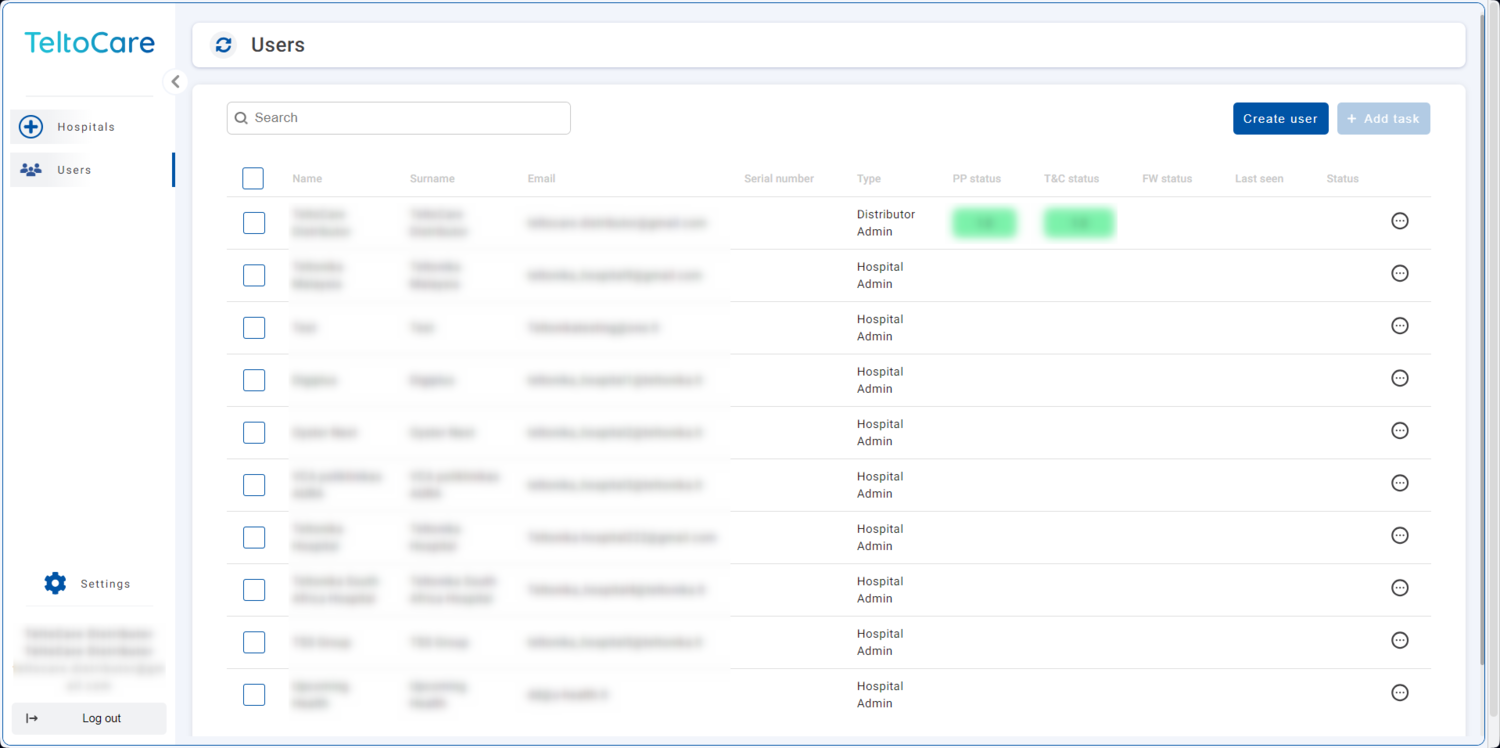
Distributor - User list
User list | ||
| The User list provides the ability to view contact details, including their names, surnames, phone numbers, emails, and affiliated hospital.
| ||
| ||
| Click ... and select Details button to view hospital’s patient list.
| ||

|
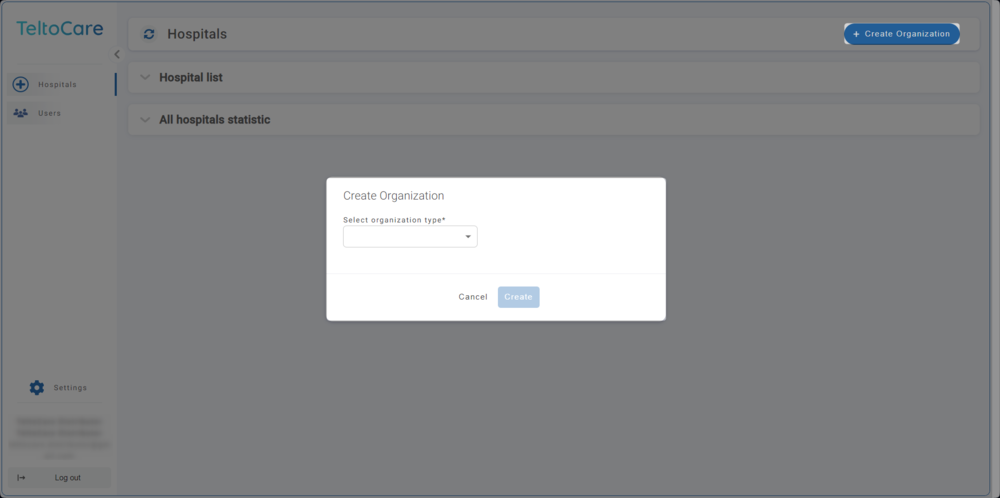
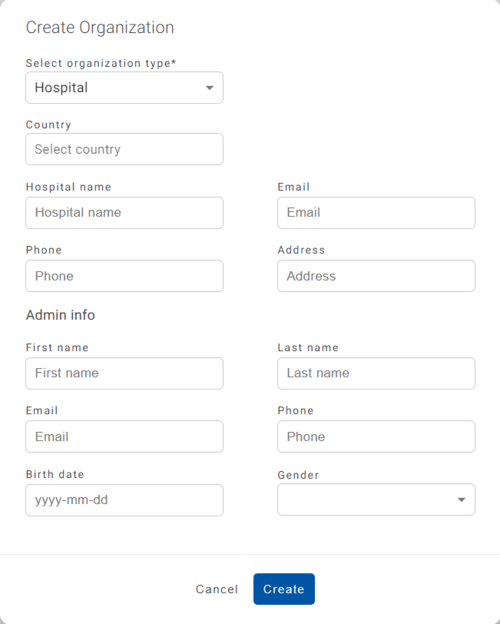
Distributor - Create a Hospital environment
Create a Hospital environment | ||
| Click on “Create Organization” button on top right side to create a Hospital account. | ||
| ||
| Enter the required information and, when done, click "Create" to establish a Hospital account. Once created, an invitation email to TeltoCare will be sent.
| ||
|
Hospital environment
Hospital environment | ||
| Hospital environment has ability to view a full list of Hospital’s doctors and patients, create new doctor accounts, view assigned patients and their medical data such as events, electrocardiogram, atrial fibrillation events and heart rate. | ||

|
Navigation bar | ||
|
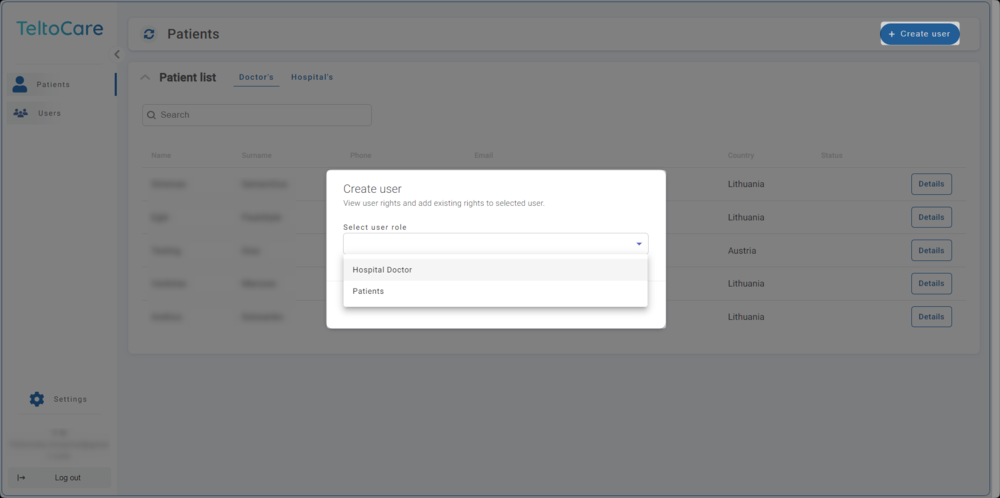
Hospital - Create user
Create user | ||
| Click the Create button to set up a new patient or doctor account. | ||
| ||
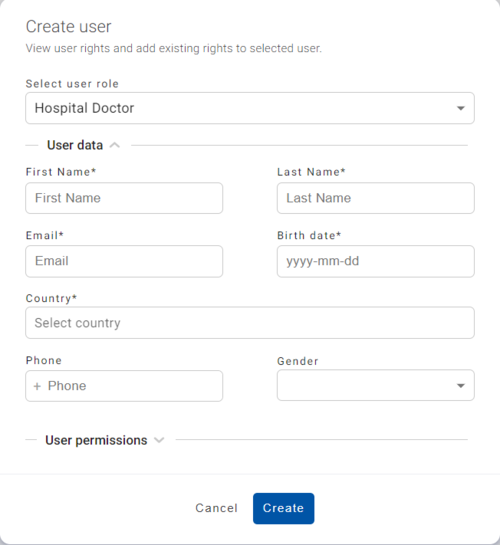
| Enter the required information and, when done, click Create to establish a Patient or Doctor account. Once created, an invitation email to the provided email will be sent. | ||
 | ||
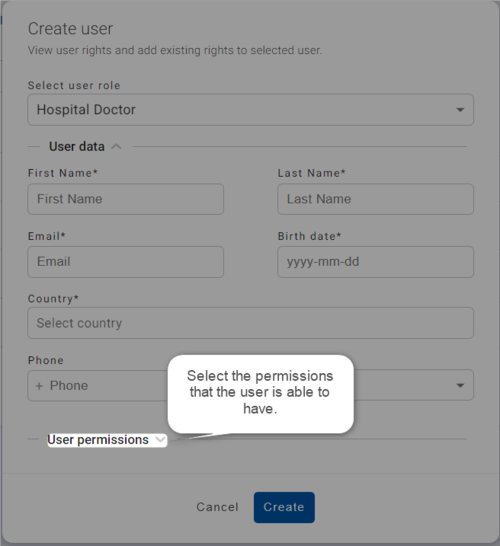
| Select the permissions that the user is able to have.
| ||
|
Doctor environment
Doctor environment | ||
| Doctors within the TeltoCare platform have access to specific patient information and data for medical purposes. They are authorized to view patients' medical records, personal information, and ECG measurement data. This access allows doctors to provide comprehensive and informed medical consultations, make accurate diagnoses, and offer appropriate treatment recommendations. | ||
|
Navigation bar | ||
|
|
Doctor - Create user
Create user | ||
| Click the Create button to set up a new patient or doctor account. | ||
|
| ||
| Enter the required information and, when done, click Create to establish a Patient or Doctor account. Once created, an invitation email to the provided email will be sent. | ||
| ||
| Select the permissions that the user is able to have.
| ||
|
|
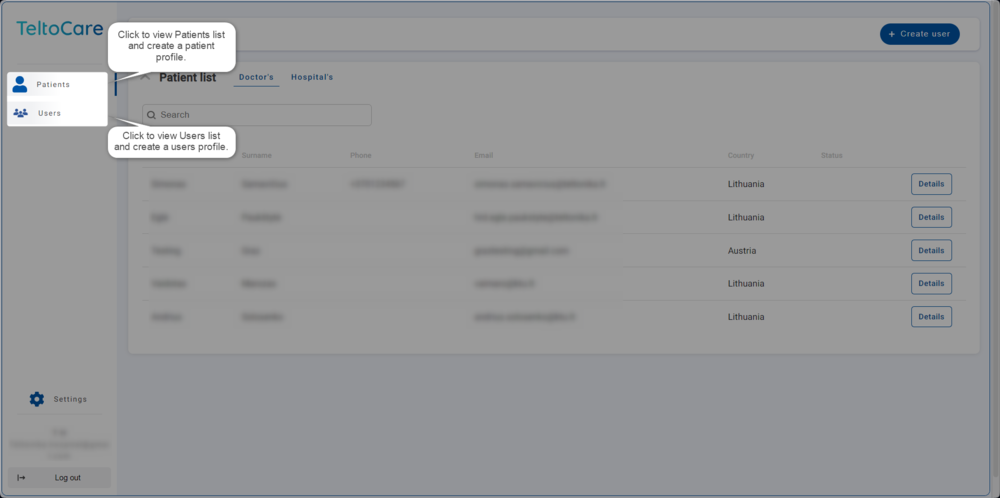
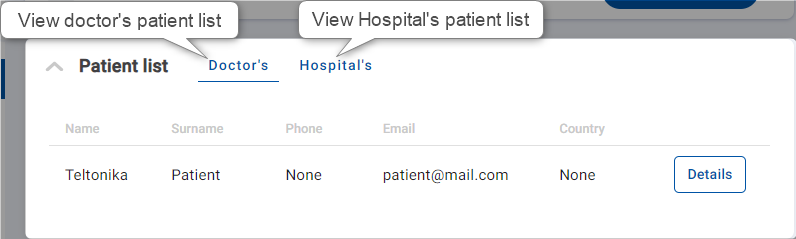
Doctor - Patient list
Patient list | ||
| The patient list provides the ability to view patient’s contact details, including their names, surnames, phone numbers, emails, and country. | ||
| ||
| Click on the first tab to view patient’s contact details. | ||
 |
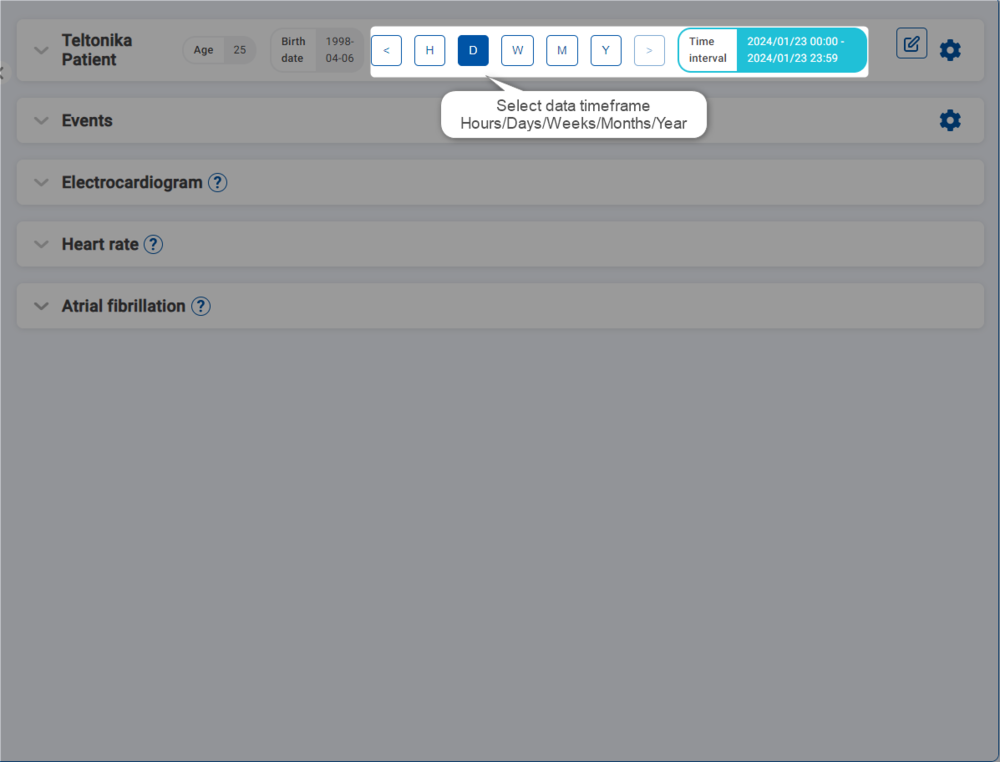
Doctor - Time interval
Time interval | ||
| Choose a time frame to view data. You can select by hour, day, week, month, or year or press on "<" or ">" icons. | ||
| ||
| You can also manually select the time interval and choose a date. | ||
 |
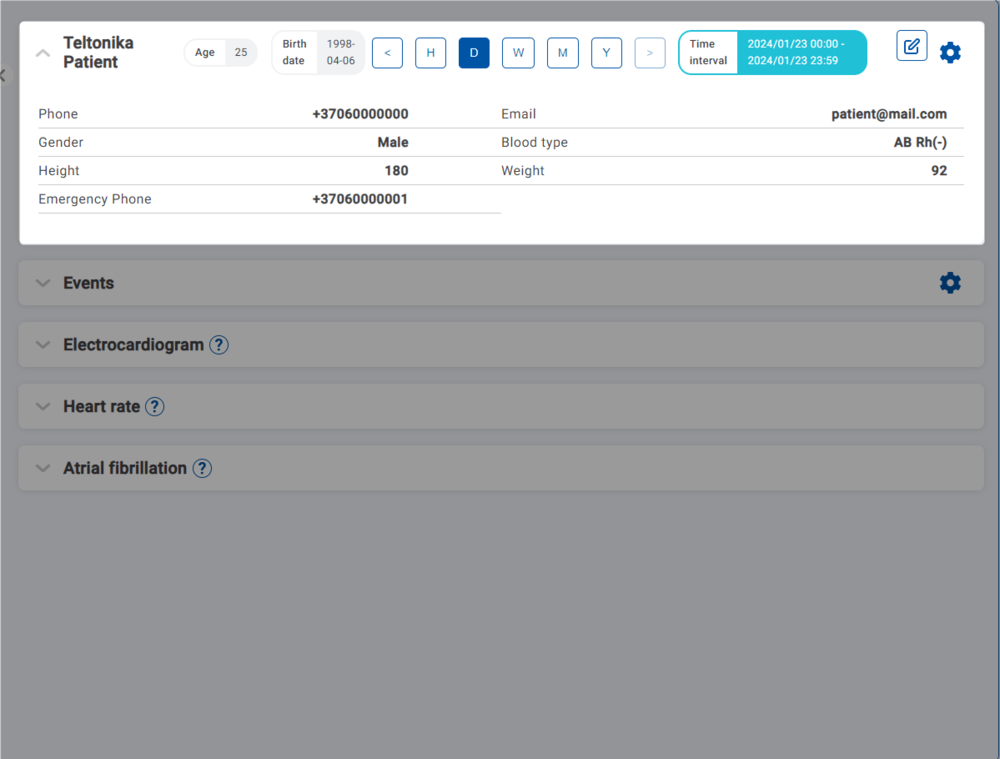
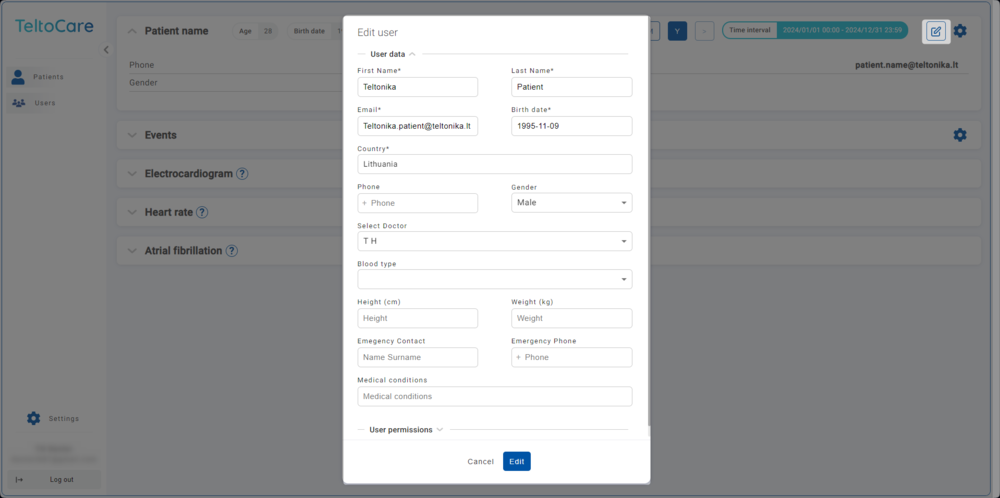
Doctor - Edit patient's information
Edit patient's information | ||
| Tap on the pencil icon to edit patient’s information. Click Edit to confirm the changes. | ||
|
Doctor - Delete a patient
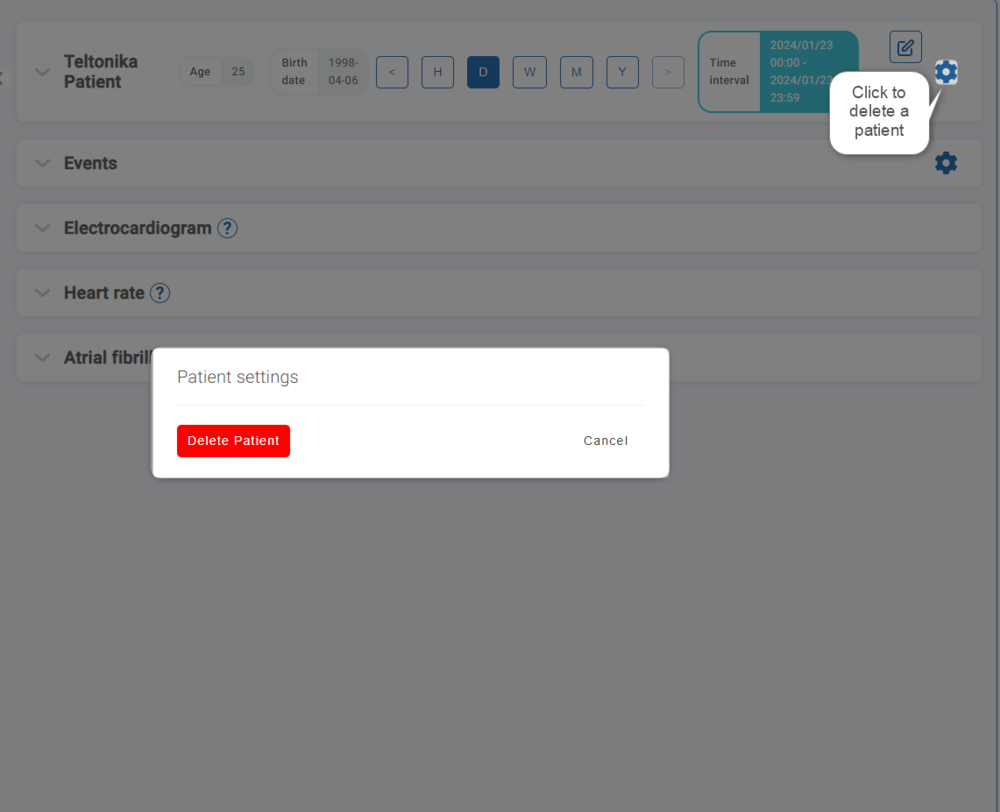
Delete a patient | ||
| If you wish to delete a patient’s account, click on the gear icon and click Delete Patient button. | ||
| ||
| Please note: If there has been a mistake or you wish to restore your account, please contact your provider or Teltonika Telemedic and within 14 days support can restore account if required. After 14 days patient will be deleted from database permanently. | ||
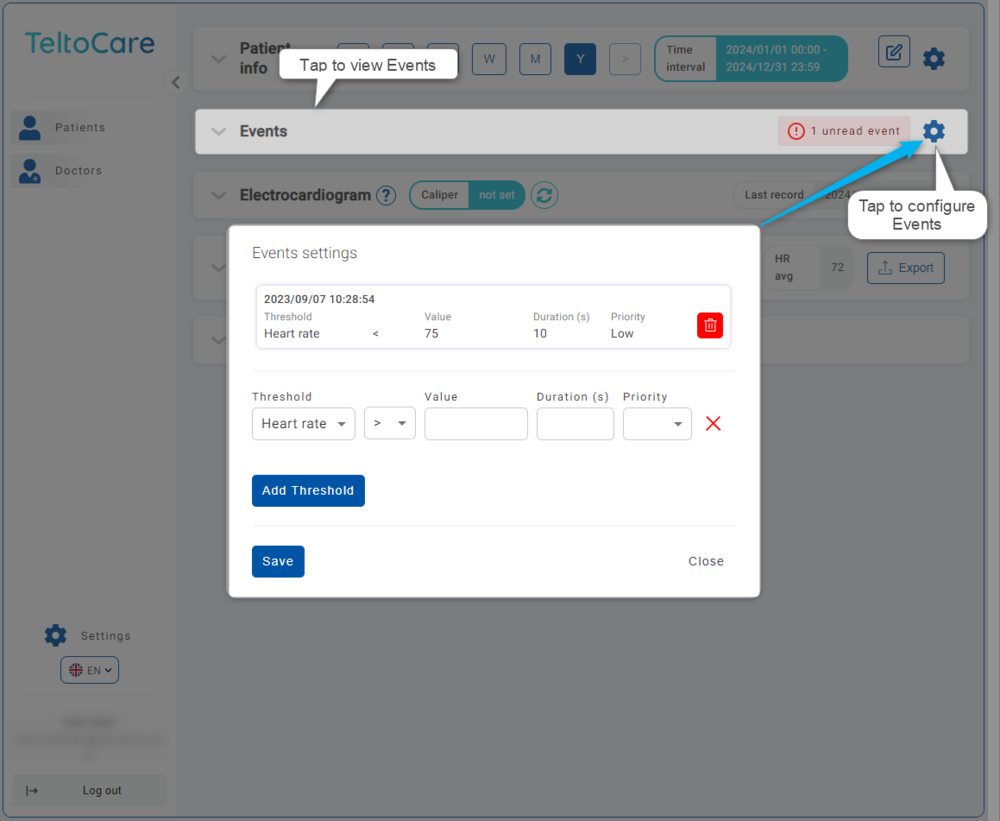
Doctor - Patient events
Patient events | ||
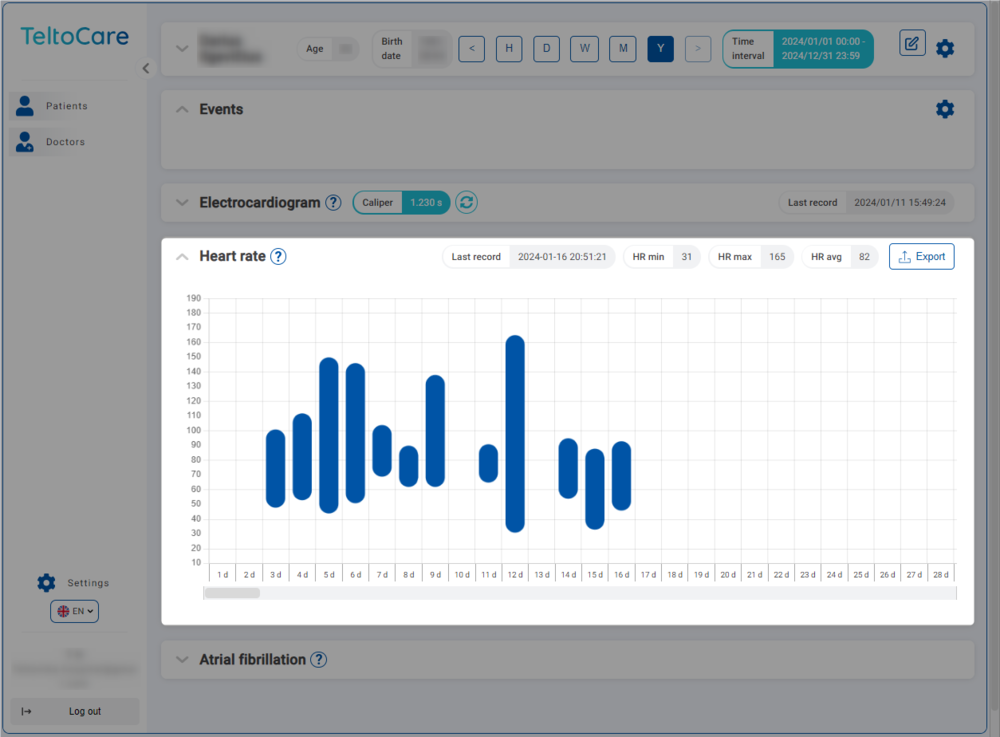
| Click on the Events tab to view the patient's heart rate events. To configure heart rate events and add thresholds, tap on the gear icon and click the "Add Thresholds" button. | ||
|
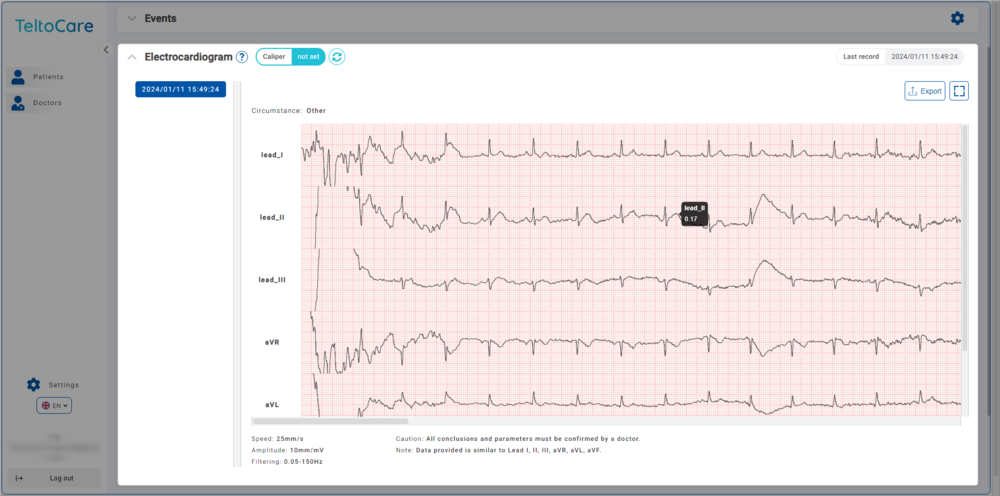
Doctor - Patient's electrocardiogram
Patient's electrocardiogram | ||
| Review the ECG recordings displayed on Electrocardiogram tab to access the relevant data related to the patient's electrocardiogram. | ||
|
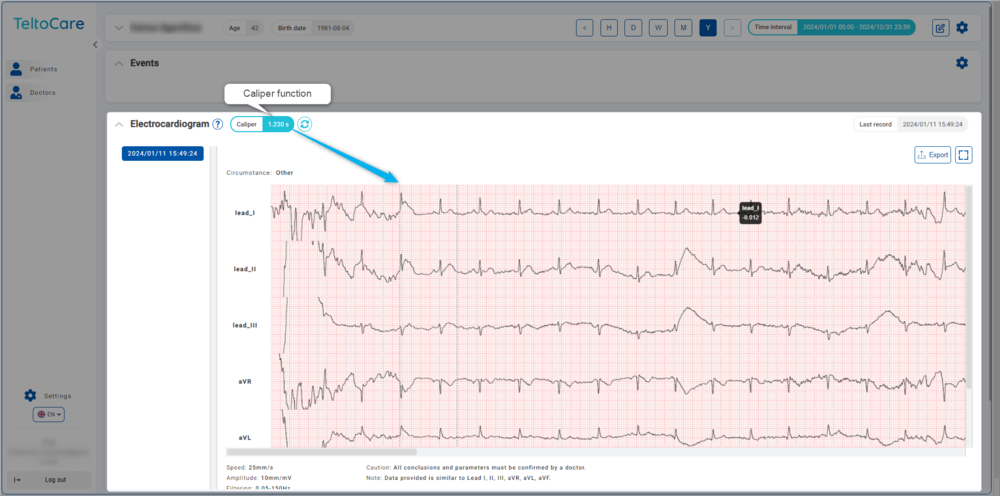
Doctor - Caliper tool
Caliper tool | ||
| Caliper Tool is a feature designed to streamline the analysis of ECG waveforms. With this tool, users can effortlessly measure the time interval between two chosen points on the ECG waveform. This tool simplifies beat-to-beat interval measurement and enhances the precision of ECG feature analysis.
To begin, open your Electrocardiogram tab and select the desired ECG waveform. Locate the ECG Caliper Tool and position the calipers on the two points you want to measure, typically R-waves for RR intervals. The tool will automatically calculate and display the time interval in a readable format. To start a new measurement, simply use the reset function. | ||
|
Doctor - Heart rate
Heart rate | ||
| Heart rate tab lets user to view both minimum and maximum heart rates, as well as the date on which these measurements were taken. Heart rate is measured in beats per minute (BPM). | ||
|
Doctor - Atrial fibrillation
Atrial fibrillation | ||
| TeltoCare offers a dedicated Atrial Fibrillation Monitoring feature, designed to assist you in managing your atrial fibrillation condition effectively. This feature provides a detailed overview of your atrial fibrillation episodes and allows you to access critical information related to each episode.
Atrial fibrillation features When you access the Atrial Fibrillation tab, you will find essential information about your atrial fibrillation episodes:
atrial fibrillation | ||
Enabling Atrial fibrillation | ||
| On your TeltoHeart, tap side button to open up a menu and select AFib function.
| ||
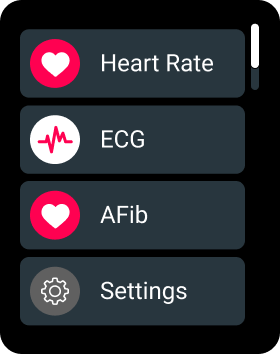 | ||
| Tap Active to activate atrial fibrillation function.
| ||
 | ||
Accessing detailed records | ||
| Each episode listed comes with a dedicated button. By clicking on this button, you can directly access the corresponding ECG record. This feature enables you to visually examine and analyse the electrical activity of patient’s heart during atrial fibrillation episodes, enhancing understanding of these events.
| ||
 |